 To make a long story short I wrote this is quick guide on configuring hybrid connectivity between Skype for Business Server and Office 365.
It is based on this TechNet article:
https://docs.microsoft.com/en-us/skypeforbusiness/hybrid/configure-hybrid-connectivity
It is assumed that your Skype for Business deployment is fully functional.
1.Make sure all necessary Skype for Business DNS are in place
Consult Understanding Skype for Business DNS Records and Autoconfiguration article for more information.
First of all, you need to be sure to have these Internal DNS Records for every SIP Domain of your SfB On-Prem deployment
| _sip._tls.<SIP DOMAIN> | SRV | 0 0 443 sip.<SIP DOMAIN> |
| _sipfederationtls._tcp.<SIP DOMAIN> | SRV | 0 0 5061 sip.<SIP DOMAIN> |
2. Plus to point #1, you have to add this/these record(s) to your Internal DNS
| DNS A record(s) for Edge Web Conferencing Service FQDN, e.g. webconf.contoso.com resolving to Web Conferencing Edge external IP(s) or External DMZ IP(s) depending on your Firewall | Internal corporate network connected users’ computers | Enable online users to present or view content in on-premises hosted meetings. Content includes PowerPoint files, whiteboards, polls, and shared notes. |
More info here: Plan hybrid connectivity DNS settings
Prevent this issue: Online users can’t present content in on-premises hosted meetings in a Skype for Business hybrid deployment
3. Connect to SfB Online via PowerShell (Manage Skype for Business Online with Office 365 PowerShell)
Remember to use a “.onmicrosoft.com” account to avoid connection issue:
|
1 2 3 4 |
Import-Module SkypeOnlineConnector $userCredential = Get-Credential -UserName admin@domain.com -Message "Enter your credentials" $sfbSession = New-CsOnlineSession -Credential $userCredential -OverrideAdminDomain onmicrosoft.com Import-PSSession $sfbSession -AllowClobber |
4. Run this command to check the Tenant configuration (save output for documentation purpose)
|
1 |
Get-CsTenantFederationConfiguration |
5. Run this command to enable Hybrid configuration on your Tenant
|
1 |
Set-CsTenantFederationConfiguration -SharedSipAddressSpace $True |
6. Run this command on your On-Prem Front-End to check EDGE configuration
|
1 2 3 4 5 6 7 8 9 10 11 12 13 14 15 16 17 18 19 20 21 22 23 24 25 |
Get-CsAccessEdgeConfiguration Identity : Global AllowAnonymousUsers : True AllowFederatedUsers : True AllowOutsideUsers : True BeClearingHouse : False EnablePartnerDiscovery : True DiscoveredPartnerVerificationLevel : UseSourceVerification EnableArchivingDisclaimer : True EnableUserReplicator : False KeepCrlsUpToDateForPeers : True MarkSourceVerifiableOnOutgoingMessages : True OutgoingTlsCountForFederatedPartners : 4 DnsSrvCacheRecordCount : 131072 DiscoveredPartnerStandardRate : 20 EnableDiscoveredPartnerContactsLimit : True MaxContactsPerDiscoveredPartner : 1000 DiscoveredPartnerReportPeriodMinutes : 60 MaxAcceptedCertificatesStored : 1000 MaxRejectedCertificatesStored : 500 CertificatesDeletedPercentage : 20 SkypeSearchUrl : https://skypegraph.skype.com/search/v1.0 RoutingMethod : UseDnsSrvRouting |
If settings are not as above, run this command to set it correctly
|
1 |
Set-CSAccessEdgeConfiguration -AllowOutsideUsers $true -AllowFederatedUsers $true -UseDnsSrvRouting -EnablePartnerDiscovery $true |
7. Run this command on your On-Prem Front-End to check existing Hosting Providers,
|
1 |
Get-CsHostingProvider |
find the one with ProxyFqdn = sipfed.online.lync.com
|
1 2 3 4 5 6 7 8 9 |
Identity : Skype for Business Online Name : Skype for Business Online ProxyFqdn : sipfed.online.lync.com VerificationLevel : UseSourceVerification Enabled : True EnabledSharedAddressSpace : True HostsOCSUsers : True IsLocal : False AutodiscoverUrl : https://webdir.online.lync.com/Autodiscover/AutodiscoverService.svc/root |
8. If some settings are different from above, remove the existing Hosting Provider and run this command to create the correct one
|
1 |
New-CSHostingProvider -Identity "Skype for Business Online" -ProxyFqdn "sipfed.online.lync.com" -Enabled $true -EnabledSharedAddressSpace $true -HostsOCSUsers $true -VerificationLevel UseSourceVerification -IsLocal $false -AutodiscoverUrl https://webdir.online.lync.com/Autodiscover/AutodiscoverService.svc/root |
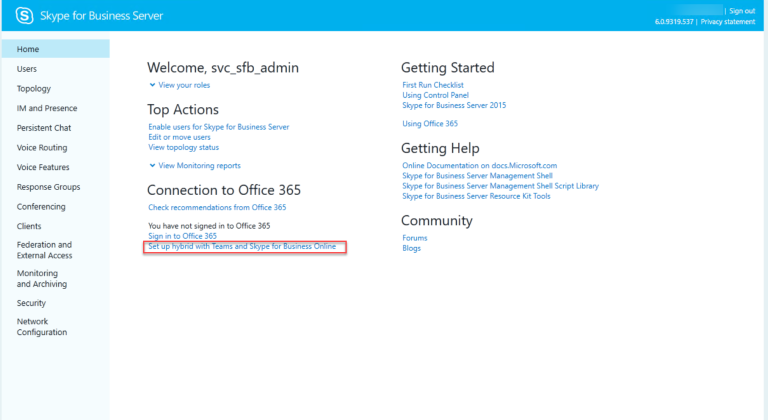
9. Now open the SfB Control Panel and click on Set up hybrid with Teams and Skype for Business Online
 10. You will probably find “Federation with Office 365 is not configured”, click Next
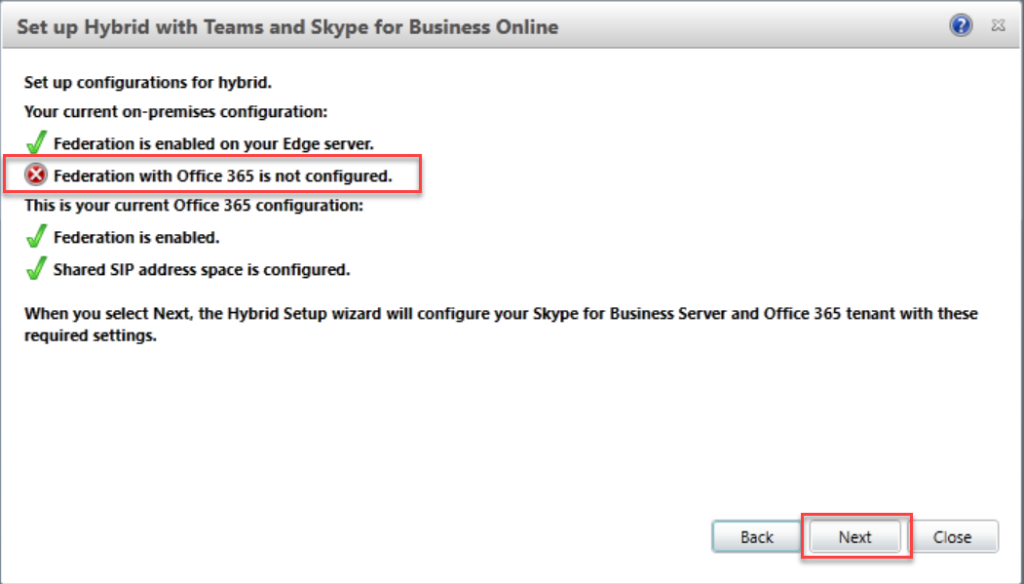
after few seconds the federation will be marked as green
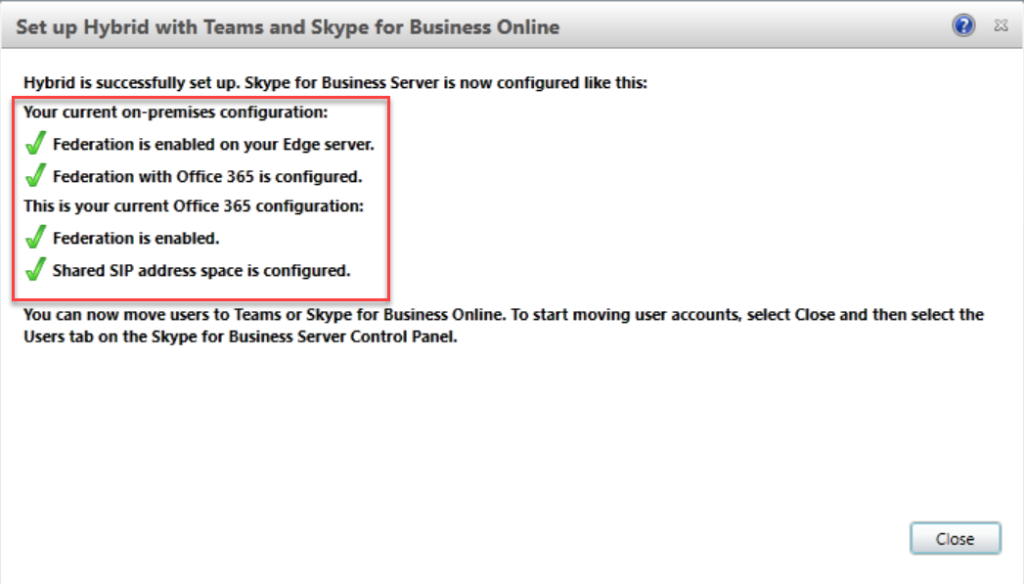
Now your hybrid configuration should work (if not, double check previous steps)
The last step can be done via Powershell as well.
Enable federation between SfB on-premises and Office 365:
|
1 |
Set-CSAccessEdgeConfiguration -AllowOutsideUsers $True -AllowFederatedUsers $True -EnablePartnerDiscovery $True -UseDnsSrvRouting |
Configure shared SIP address space:
|
1 |
Set-CsTenantFederationConfiguration -SharedSipAddressSpace $true |
Now you are ready to move users from on-premises to cloud or migrate users from Skype for Business to Teams!


