By default, maximum upload size in WordPress ranges from 2MB to 150MB depending on the settings of your web hosting provider is giving by default.
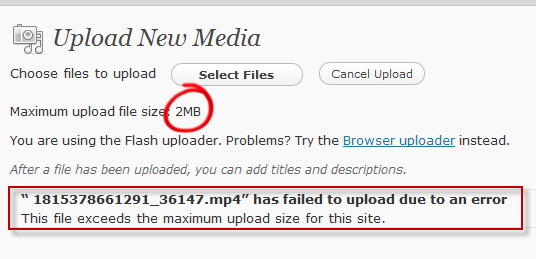
To check what is the current max upload size limit in your WordPress site then navigate to WP Admin → Media → Add New. You will see the current max upload size on the bottom as shown in the screenshot.
If the current max upload size limit meets your demand then you can leave it as it is. However, if it doesn’t then don’t fret, there are many ways you can increase the max upload size in WordPress.
1. Update .htaccess file
If your web server is using Apache and PHP is set as an Apache module, then you can add a few lines of code in your WordPress .htaccess file to increase the max upload size in WordPress.
To access your .htaccess file, connect to your server via FTP client and navigate to the folder where WordPress is installed. Open up .htaccess file in a code editor or Notepad and add the following lines.
- php_value upload_max_filesize 64M
- php_value post_max_size 128M
- php_value memory_limit 256M
- php_value max_execution_time 300
- php_value max_input_time 300
This will define the max upload size in Megabytes. Replace the numbers as per your requirement. The max execution time and max input time are in seconds. The execution time defines the limit of time spent on a single script. Choose a number that is suitable for your site.
2. Edit Functions.php File
In some cases, you might not be able to access your .htaccess file or you are more comfortable editing WordPress theme files.
You can easily increase the size limits by adding the following lines of code in the functions.php file of your theme.
However, remember if you change the theme then max upload size will return to its default values until you edit the functions.php file of the new theme.
- @ini_set( ‘upload_max_size’ , ’64M’ );
- @ini_set( ‘post_max_size’, ’64M’);
- @ini_set( ‘max_execution_time’, ‘300’ );
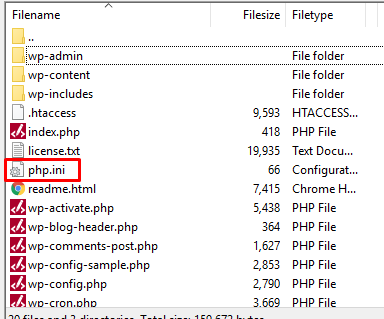
3. php.ini Option
This is a default file used to configure any application which runs on PHP. This file contains parameters required for file timeout, upload size, and resource limits. Access your WordPress root directory using SSH or FTP and look for a php.ini file. In some cases, this file is not visible to the other option would be to create a new file instead.
Open any text editor and create a new file. Copy the following code and save it as php.ini.
- upload_max_filesize = 25M
- post_max_size = 13M
- memory_limit = 15M
Now, upload that php.ini file using SSH or FTP inside the same root folder.
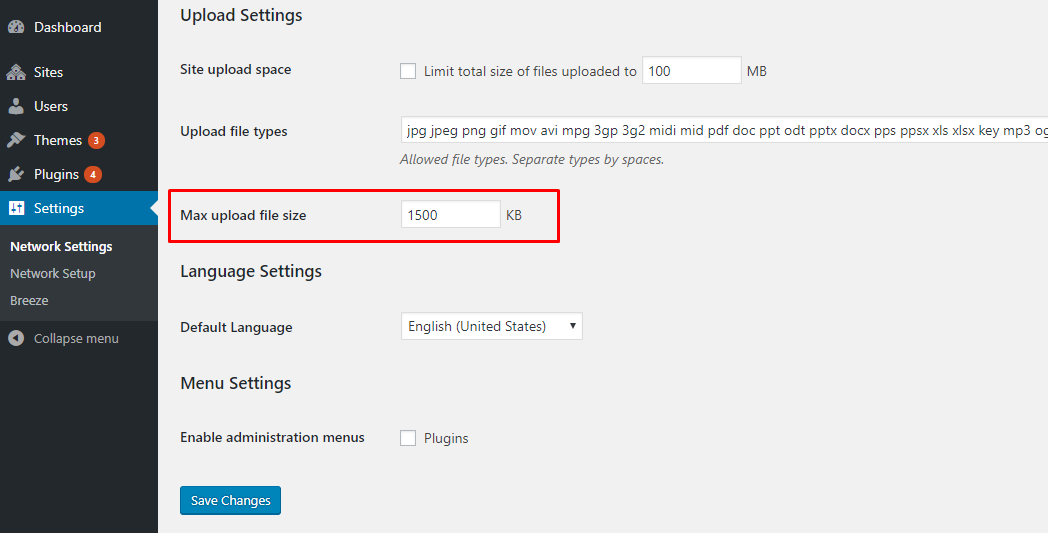
4. Increase Upload Size in Multisite
If you are running WordPress multisite, then upload size can be increased from settings. This increase is dependent on your server settings. If your server is set to 20MB you cannot increase WordPress upload size to 25MB. However, if your server is set to 20MB your network setting is set to 15 MB then you can resolve the issue by increasing the upload size to 20MB.
5. wp-config.php File
Another way of increasing the upload size in WordPress is to define the size parameter in the wp-config.php file. To do that, access your WordPress root directory using SSH or FTP and locate a wp-config.php file.
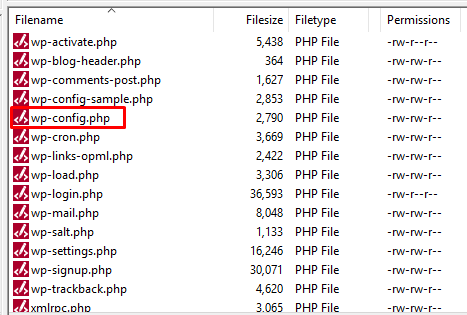
Open the file in any text editor and add the following code.
- @ini_set( ‘upload_max_size’ , ’20M’ );
- @ini_set( ‘post_max_size’, ’13M’);
- @ini_set( ‘memory_limit’, ’15M’ );
Save your changes and it should increase your file upload size.
6. Plugin Method
Not everyone is a fan of writing code or accessing root files using SSH or FTP. For that situation, the plugin comes in handy and luckily there is a WordPress plugin available for increasing WordPress upload size. The plugin we will be using is Increase Max Upload Filesize plugin.
Go to your WordPress Dashboard → Plugins → Add new, search “Increase Max Upload Filesize” then activate and install the plugin. Once installed, go to plugin settings and simply enter the value for upload size.
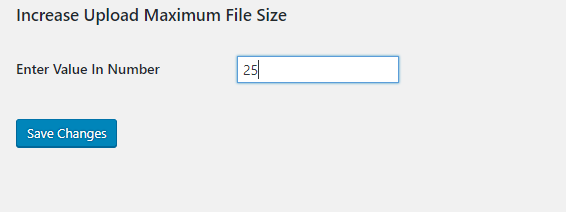
Click the Save Changes button to apply the new upload size.
7. Contact Your Hosting Provider
If you do not want to edit the files yourself then you can always contact your hosting provider to do it for you.
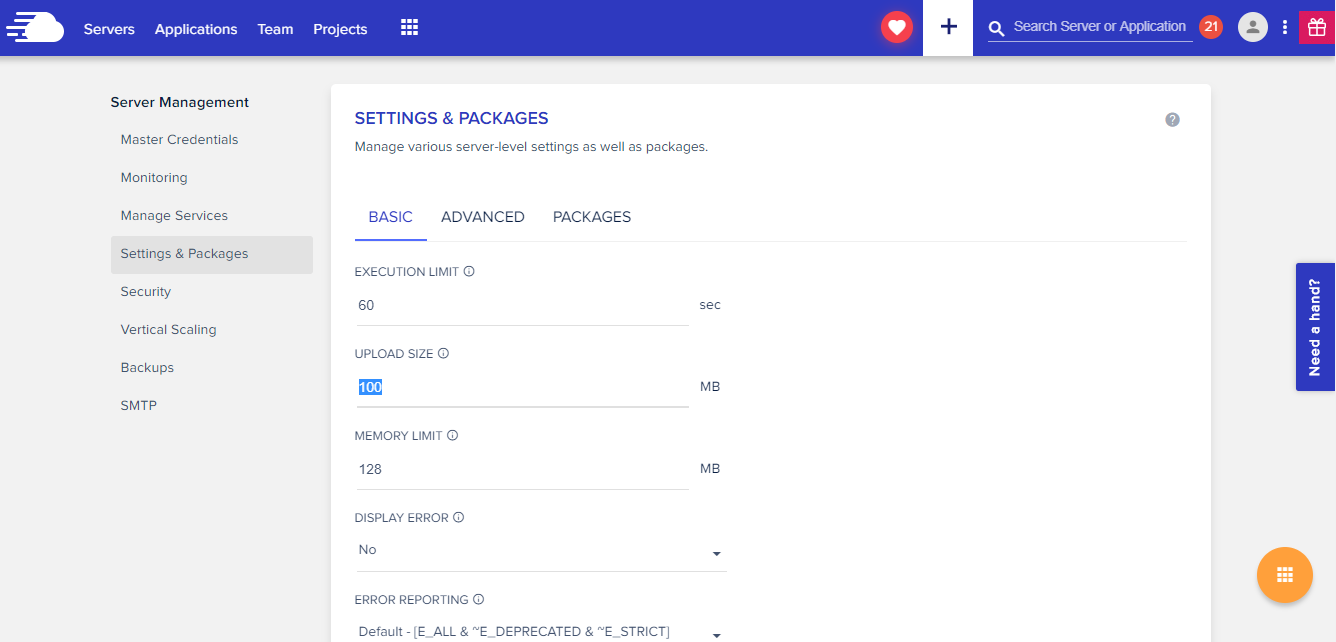
If you are using Cloudways WordPress managed hosting, then you can easily increase the max upload size limits of all your websites on a single server through the options in the platform. It is only a matter of a few clicks.
To edit upload size limit, log in to your Cloudways account navigate to Server under the Server Settings & Packages edit the Upload Size field as shown in the screenshot. Don’t forget to click on Save Changes at the bottom of the screen.