 This process can be used on any of the Polycom SIP Phones which support 4.x software today (SoundPoint IP, SoundStation IP, VVX, and SpectraLink models).
This only applies to devices which are already running at least version 4.0.0 of the UCS firmware. In previous versions (Polycom SIP software 3.x or earlier) this manual process was not available. Also the firmware was packaged differently in the previous SIP versions as the device firmware was provided as two separate binary files, the bootloader image and the application image. In the 4.x UCS release these were merged into the same binary file. New devices like the VVX500 and SpectraLink phones have only ever shipped with 4.x UCS releases, while older devices like SoundPoint IP phones may still have previous 3.x SIP releases on them. In order to utilize Lync integration a one-time update process must first be used to upgrade devices running 3.x to 4.x.
Updating Firmware
The Polycom SIP phones support a few different methods for software updates, most commonly utilizing a central FTP provisioning server so that all devices will check a single distribution point for configuration changes and new firmware images. The previous article mentioned above contains links with more details on enterprise deployment and management practices.
But when trying to update the firmware for a few phones there is a new process which was introduced with the 4.0 release of UCS. This process allows the device to be manually pointed to a Polycom hosted web server distribution point on the Internet to download and install new firmware packages from. As of the writing of this article the Lync specific firmware release is not yet included on the Polycom Hosted Server, so primarily Open SIP only firmware releases will be available using this method. This same process can also be used to download files from a custom distribution server for use with the Lync Qualified releases, as covered in the next section of this article
- Identify the IP address assigned to the first phone to be upgraded by navigating on the device to the Settings Menu > Status > Network > TCP/IP Parameters and check the IP value.
- Connect to the IP address of the phone using a web browser.
![]()
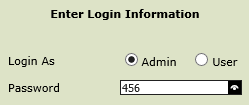
- You will be prompted for login information select Logon As Admin and enter ‘456’ which is the default password.
- From the Utilities menu select Software Upgrade. Verify that the Server Type is set to Polycom Hosted Server and then click the Check for Updates button.
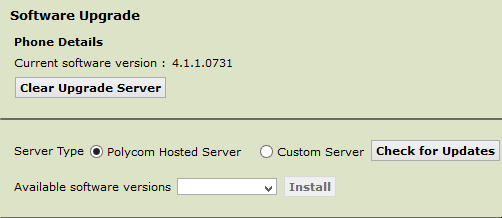
- You should now see the list of firmware version available for download

- Select the desired version (if there is more than one listed) and click the Install button. This will trigger a reboot of the phone and begin the update process.
- Immediately after rebooting the phone should report the status of “Updating, Please Wait” followed soon after by “Downloading new Updater…”. This status bar here will indicate the completion of downloading the .sip.ld binary file for the desired update version for the specific phone model.
- The phone will then report “Updater updated, rebooting” and then after the reboot should report “Downloading new application”. Once this process is complete the device update will be complete and it will start the application interface. Any configuration settings previously entered will be retained.
Normally only the latest version will be provided on the Polycom Hosted Server, but this central distribution point may not include the most recent versions released depending on what features or capabilities were introduced in the last release. For example the recent 4.1 release is only providing Lync-specific features so devices currently used with other SIP platforms (.e.g Broadsoft, Avaya, Nortel, etc) should not install this update and should remain on 4.0 software for now.
For this reason it may be necessary to download the available software package for the 4.1 release and then create a custom distribution server to point the devices to.
Using Custom Software Distribution
To create a custom software distribution a software package must first be downloaded, the firmware files extracted, and then a configuration file created and modified. There is still some initial setup required but this is a basic as creating a single XML file and then dropping it an the desired firmware files directly into any web server directory. For engineers looking to carry phones around to different sites for demonstration purposes then selecting a web server on the Internet makes it very easy to update the phones over the Internet, while for supporting updates for a handful of devices on an internal network then utilizing an existing web server is ideal. Either way once the directory is setup then any device can be manually pointed to the directory and the phone will utilize HTTP to download and apply the firmware. Also this process can be used to downgrade software if needed as multiple versions can be stored in the same location and a menu will be presented to allow the desired version to be installed.
All currently available versions of the Polycom UCS can be located in the official software release matrix online as well as on the product support page for any model SIP phone. Always make sure to download the Split version of any versions as two different types of packages are provided: a Combined package with all firmware files for all phones provided in a single large binary, or a Split package which contains individual binary files for each phone model’s specific software version.
- Browse to the Polycom Voice Support website to locate the software package for a specific family of devices or go to to the Polycom UCS/SIP Software Matrix website and download the desired release package.
- Read and accept the notice regarding the previously explained upgrade process requirements for older devices.
- Once the download is complete open the compressed file and look for the *.sip.ld files. These are the individual firmware files for each model of Polycom SIP phone. The table below indicates which firmware file is used by which device.
Model Name Firmware Filename SoundPoint IP 321 2345-12360-001.sip.ld SoundPoint IP 331 2345-12365-001.sip.ld SoundPoint IP 335 2345-12375-001.sip.ld SoundPoint IP 450 2345-12450-001.sip.ld SoundPoint IP 550 2345-12500-001.sip.ld SoundPoint IP 560 2345-12560-001.sip.ld SoundPoint IP 650 2345-12600-001.sip.ld VVX 1500 2345-17960-001.sip.ld SoundStation Duo 3111-19000-001.sip.ld SoundStation IP 5000 3111-30900-001.sip.ld SpectraLink 8440 3111-36150-001.sip.ld SpectraLink 8450 3111-36152-001.sip.ld SpectraLink 8452 3111-36154-001.sip.ld VVX 500 3111-44500-001.sip.ld VVX 600 3111-44600-001.sip.ld
- Extract either all of the .sip.ld files or select only the files associated to the model of phones that will need to be updated. (There is no harm in selecting all firmware files other than the additional disk space that will be used on the web server to store unneeded files, which is under 400MB for all images with the current releases combined).
- In this example only the IP 5000 phone will be updated, so the following file was extracted to an empty folder named firmware.

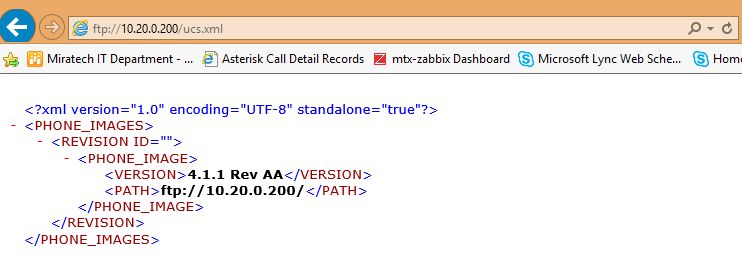
- In the same directory create a new text file called ucs.xml and then open it with a text editor. Copy the text below and paste it into the blank file.
<?xml version=”1.0″ encoding=”utf-8″ standalone=”yes”?>
<PHONE_IMAGES>
<REVISION ID=””>
<PHONE_IMAGE>
<VERSION>0.0.0</VERSION>
<PATH>http://webserver.domain.com/folder/</PATH>
</PHONE_IMAGE>
</REVISION>
</PHONE_IMAGES>
then edit it and set proper version and firmware path:
<?xml version=”1.0″ encoding=”utf-8″ standalone=”yes”?>
<PHONE_IMAGES>
<REVISION ID=””>
<PHONE_IMAGE>
<VERSION>4.1.1 Rev AA</VERSION>
<PATH>ftp://10.20.0.200/</PATH>
</PHONE_IMAGE>
</REVISION>
</PHONE_IMAGES>
- Test the configuration by accessing the ucs.xml file on the web server directly from a web browser.
- Now access the web UI of the phone and from the Utilities menu select Software Upgrade.
- Select Custom Server for the Server Type and enter the entire URL to the custom XML configuration file.
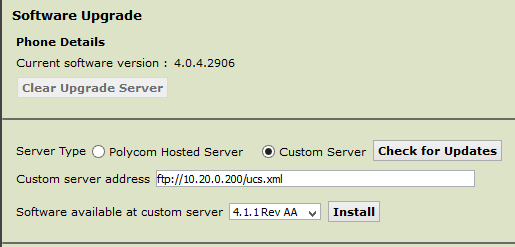
- Select the desired software version and then click the Install button to begin the process. The upgrade process will begin. Wait for phone flashes itself and reboots. Done!